
When I set out to demonstrate how the MongoDB Atlas Data API allows modern microcontrollers to communicate directly with MongoDB Atlas, I initially built a pager. You know, those buzzy things that go off during the holiday season to let you know there is bad news and you need to go fix something right now. I quickly realized this was not what people wanted to be reminded of during the holiday season, nor did it allow everyone viewing to interact… Well, I could let them page me and interrupt my holiday, but how would they know I got it? In the end, I decided to put my Christmas tree on the internet instead.
Looking at the problem, it meant I needed to provide two parts: a way to control the tree lights using Atlas and an API, and a way to view the tree. In this holiday special article, I describe how to do both: create API-controlled fairy lights, and build a basic MongoDB-powered IP surveillance camera.
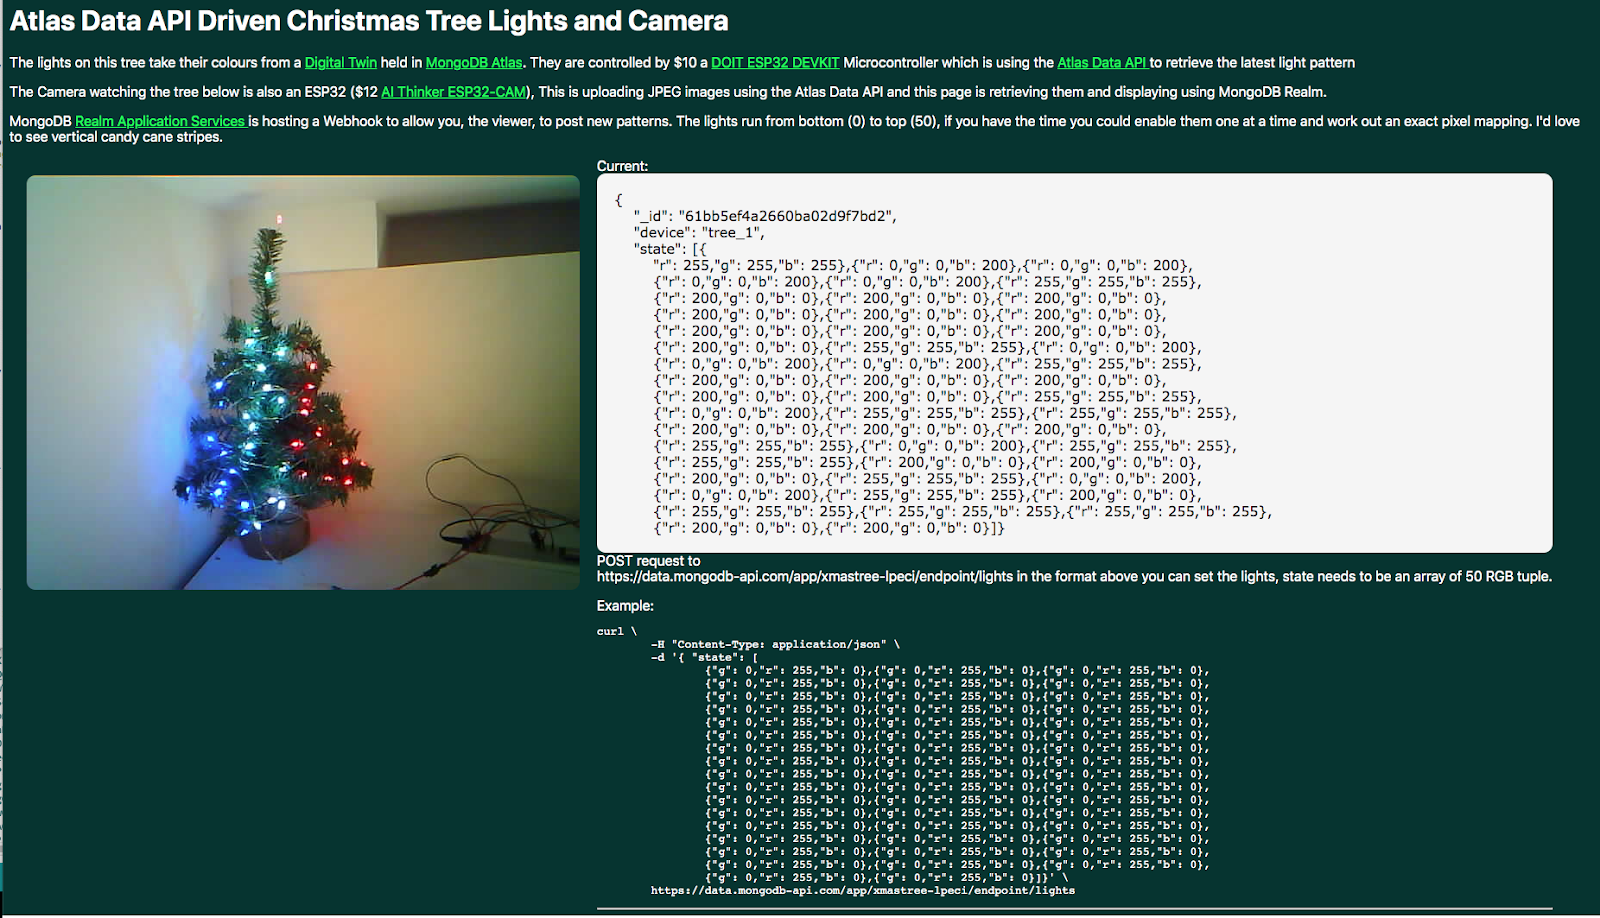
Before I bore you with details of breadboard voltages, SRAM banks, and base64 encoding, here is a link to the live view of the tree with details of how you can change the light colours. It may take a few seconds before you see your change.
#https://xmastree-lpeci.mongodbstitch.com/
This is not a step-by-step tutorial. I'm sorry but that would be too long. However, if you are familiar with Arduino and other Maker tools, or are prepared to google a few how-tos, it should provide you with all the information you need to create your own setup. Otherwise, it's simply a fascinating read about tiny computers and their challenges.
The MongoDB Atlas Data APIis an HTTPS-based API that allows us to read and write data in Atlas, where a MongoDB driver library is either not available or not desirable. In this case, I am looking at how to call it from an ESP32 Microcontroller using the Arduino APIs and C++/Wiring.
#Prerequisites
You will need the Arduino IDE to upload code to our microcontrollers.
You will also need an Atlas cluster for which you have enabled the Data API, and our endpoint URL and API key. You can learn how to get these in this article or this video if you do not have them already.
If you want to directly upload the Realm application to enable the API and viewer, you will need the Realm command-line interface.
You will also need the following hardware or similar:
#Lights
- JZK ESP-32S ESP32 Development Board ($10 Here)
- Neopixel compatible light string ($20 Here)
- Breadboard, Power Regulator, and Dupont Cables ($5 here)
- 9v x 3A Power supply ($14 here)
- 1000 microfarad capacitor
- 330 ohm resistor
#Webcam
- ESP32 AI Thinker Camera ($10 here)
- USB Power Supply
#Creating the Christmas Light Hardware
Neopixel 24-bit RGB individually addressable LEDs have become somewhat ubiquitous in maker projects. Aside from occasional finicky power requirements, they are easy to use and well supported and need only power and one data line to be connected. Neopixels and clones have also dropped in price dramatically since I first tried to make smart Christmas lights back in (checks email…) 2014, when I paid $14 for four of them and even then struggled to solder them nicely. I saw a string of 50 LEDs at under $20 on very fine wire and thought I had to try again with the Christmas tree idea.
![]() Neopixels on a String
Neopixels on a String
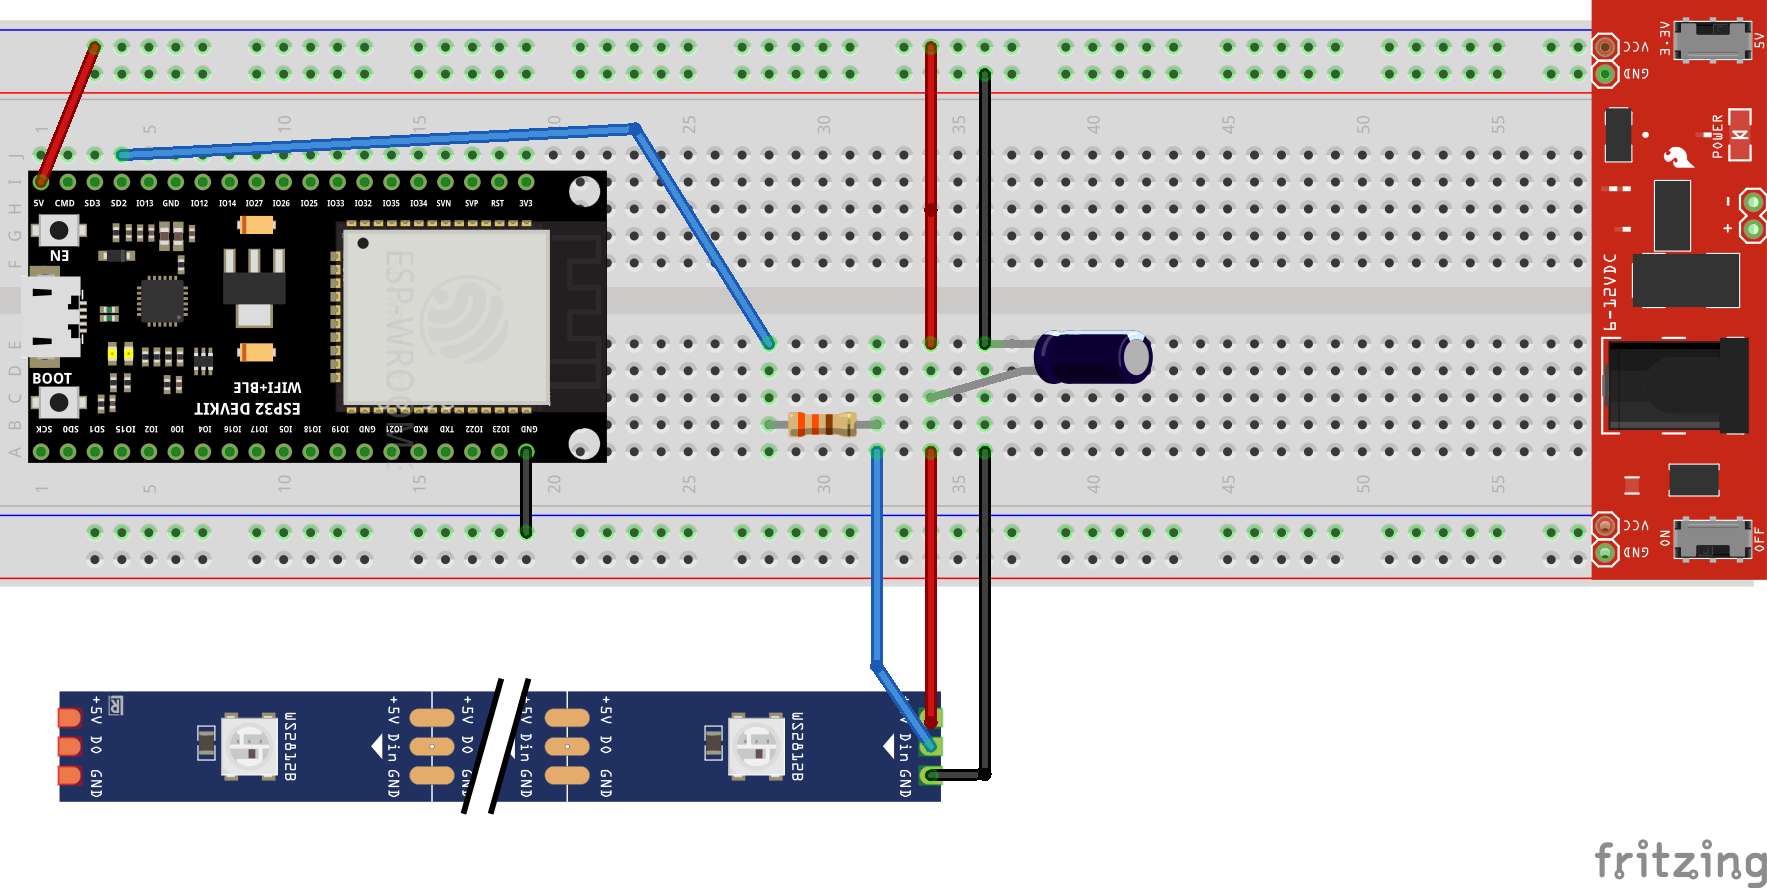
Overall, the circuit for the tree is very simple. Neopixels don't need a lot of supporting hardware, just a capacitor across the power cables to avoid any sudden power spikes. They do need to be run at 5v, though. Initially, I was using 3.3v as that was what the ESP board data pins output, but that resulted in the blue colour being dim as underpowered and equal red, green, and blue values giving an orange colour rather than white.
Since moving to an all 5v power circuit and 3.3v just on the data line, it's a much better colour, although given the length and fineness of the wire, you can see the furthest away neopixels are dimmer, especially in blue. Looping wires from the end back to the start like a household ring-main would be a good fix for this but I'd already cut the JST connector off at the top.
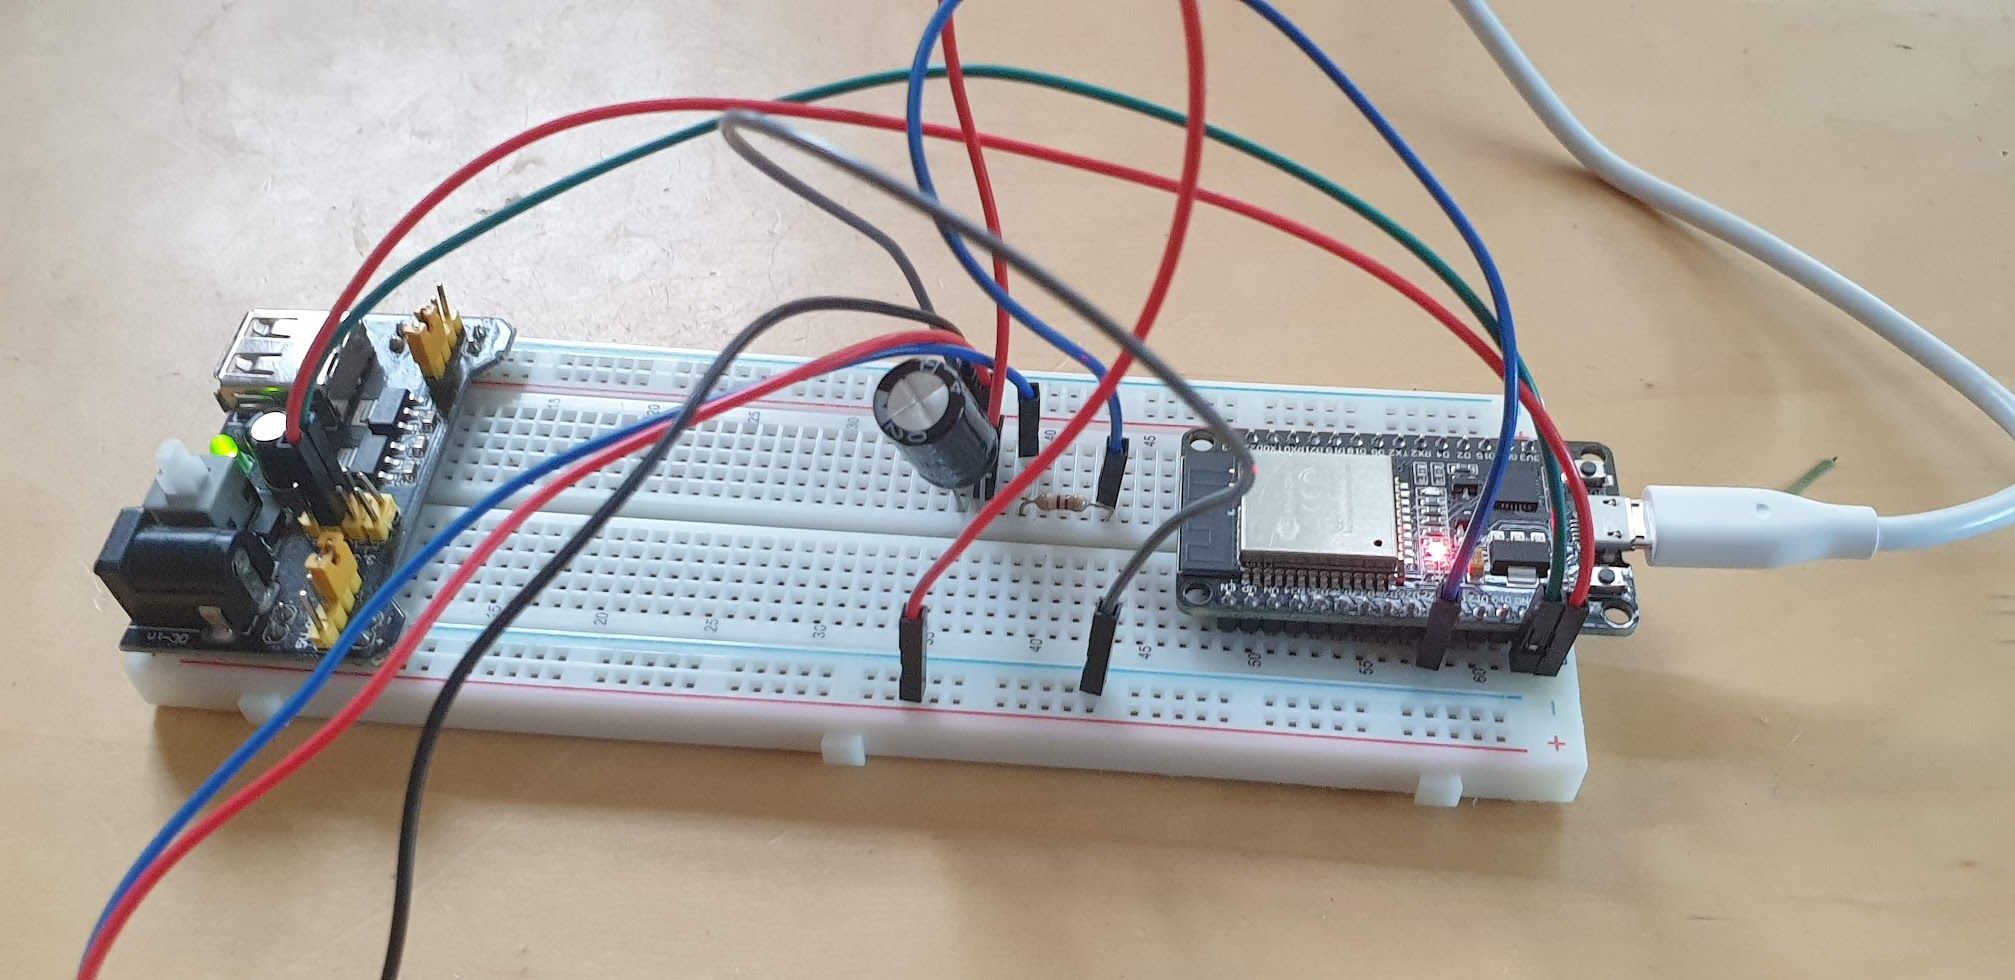
My board isn't quite as neatly laid out. I had to take 5v from the power pins directly. It works just as well though. (DC Power Supply not shown in the image, Pixel string out of shot.)
#Developing the Controller Software for the ESP32
Source Code Location: https://github.com/mongodb-developer/xmas_2021_tree_camera/tree/main/ESP32-Arduino/mongo_xmastree
I used the current Arduino IDE to develop the controller software as it is so well supported and there are many great resources to help. I only learned about the 2.0 beat after I finished it.
 Arduino IDE is designed to be simple and easy to use
After the usual messing about and selecting a neopixel library (my first two choices didn't work correctly as neopixels are unusually sensitive to the specific processor and board due to strict timing requirements), I got them to light up and change colour, so I set about pulling the colour values from Atlas.
Unlike the original Arduino boards with their slow 16 bit CPUs, today's ESP32 are fast and have plenty of RAM (500KB!), and built-in WiFi. It also has some hardware support for TLS encryption calculations. For a long time, if you wanted to have a Microcontroller talk to the Internet, you had to use an unencrypted HTTP connection, but no more. ESP32 boards can talk to anything.
Like most Makers, I took some code I already had, read some tutorial hints and tips, and mashed it all together. And it was surprisingly easy to put this code together. You can see what I ended up with here (and no, that's not my real WiFi password).
The setup() function starts a serial connection for debugging, connects to the WiFi network, initialises the LED string, and sets the clock via NTP. I'm not sure that's required but HTTPS might want to check certificate expiry and ESP32s have no real-time clock.
The loop() function just checks if 200ms have passed, and if so, calls the largest function, getLightDefinition().
I have to confess, the current version of this code is sub-optimal. I optimised the camera code as you will see later but didn't backport the changes. This means it creates and destroys an SSL and then HTTPS connection every time it's called, which on this low powered hardware can take nearly a second. But I didn't need a super-fast update time here.
#Making an HTTPS Call from an ESP32
Once it creates a WiFiClientSecure, it then sets a root CA certificate for it. This is required to allow it to make an HTTPS connection. What I don't understand is why this certificate works as it's not in the chain of trust for Atlas. I suspect the ESP32 just ignores cases where it cannot validate the server, but it does demand to be given some form of root CA. Let me know if you have an answer to that.
Once you have a WiFiClientSecure, which encapsulates TLS rather than TCP, the rest of the code is the same as an HTTP connection, but you pass the TLS-enabled WiFiClientSecure in the constructor of the HTTPClient object. And of course, give it an HTTPS URL to work with.
To authenticate to the Data API, all I need to do is pass a header called "api-key" with the Atlas API key. This is very simple and can be done with the following fragment.
1 HTTPClient https; 2 3 if (https.begin(*client, AtlasAPIEndpoint)) { // HTTPS 4 /* Headers Required for Data API*/ 5 https.addHeader("Content-Type", "application/json"); 6 https.addHeader("api-key", AtlasAPIKey);
The Data API uses POSTed JSON for all calls. This makes it cleaner for more complex requests and avoids any caching issues. You could argue that find() operations, which are read-only, should use GET, but that would require passing JSON as part of the URL and that is ugly and has security and size limitations, so all the calls use POST and a JSON Body.
#Writing JSON on an ESP32 Using Arduino JSON
I was amazed at how easy and efficient the ArduinoJSON library was to use. If you aren't used to computers with less than 1MB of total RAM and a 240MHz CPU, you may think of JSON as just a good go-to data format. But the truth is JSON is far from efficient when it comes to processing. This is one reason MongoDB uses BSON. I think only XML takes more CPU cycles to read and write than JSON does. Benoît Blanchon has done an amazing job developing this lightweight and efficient but comprehensive library.
This might be a good time to mention that although ESP32-based systems can run https://micropython.org/, I chose to build this using the Arduino IDE and C++/Wiring. This is a bit more work but possibly required for some of the libraries I used.
This snippet shows what a relatively small amount of code is required to create a JSON payload and call the Atlas Data API to get the latest light pattern.
1 DynamicJsonDocument payload (1024); 2 payload["dataSource"] = "Cluster0"; 3 payload["database"] = "xmastree"; 4 payload["collection"] = "patterns"; 5 payload["filter"]["device"] = "tree_1"; 6 if(strcmp(lastid,"0")) payload["filter"]["_id"]["$gt"]["$oid"] = lastid; 7 payload["limit"] = 1; 8 payload["sort"]["_id"] = -1; 9 10 String JSONText; 11 size_t JSONlength = serializeJson(payload, JSONText); 12 Serial.println(JSONText); 13 int httpCode = https.sendRequest("POST", JSONText);
#Using Explicit BSON Data Types to Search via EJSON
To avoid fetching the light pattern every 500ms, I included a query to say only fetch the latest pattern sort({_id:1).limit(1) and only if the _id field is greater than the last one I fetched. My _id field is using the default ObjectID data type, which means as I insert them, they are increasing in value automatically.
Note that to search for a field of type ObjectID, a MongoDB-specific Binary GUID data type, I had to use Extended JSON (EJSON) and construct a query that goes { _id : { $gt : {$oid : "61bb4a79ee3a9009e25f9111"}}}. If I used just {_id:61bb4a79ee3a9009e25f9111"}, Atlas would be searching for that string, not for an ObjectId with that binary value.
#Parsing a JSON Payload with Arduino and ESP32
The ArduinoJSON library also made parsing my incoming response very simple too—both to get the pattern of lights but also to get the latest value of _id to use in future queries. Currently, the Data API only returns JSON, not EJSON, so you don't need to worry about parsing any BSON types—for example, our ObjectId.
1 if (httpCode == HTTP_CODE_OK || httpCode == HTTP_CODE_MOVED_PERMANENTLY) { 2 String payload = https.getString(); 3 DynamicJsonDocument description(32687); 4 DeserializationError error = deserializeJson(description, payload); 5 if (error) { 6 Serial.println(error.f_str()); 7 delete client; 8 return; 9 } 10 11 if(description["documents"].size() == 0) { 12 Serial.println("No Change to Lights"); 13 delete client; return;} 14 15 JsonVariant lights = description["documents"][0]["state"]; 16 if(! lights.is<JsonArray>()) { 17 Serial.println("state is not an array"); 18 delete client; 19 return; 20 } 21 22 setLights(lights.as<JsonArray>()); 23 strncpy(lastid,description["documents"][0]["_id"],24);
Using ArduinoJSON, I can even pass a JSONArray to a function without needing to know what it is an array of. I can inspect the destination function and deal with different data types appropriately. I love when libraries in strongly typed languages like C++ that deal with dynamic data structures provide this type of facility.
This brings us to the last part of our lights code: setting the lights. This makes use of JsonVariant, a type you can inspect and convert at runtime to the C++ type you need.
1 void setLights(const JsonArray& lights) 2 { 3 Serial.println(lights.size()); 4 int light_no; 5 for (JsonVariant v : lights) { 6 int r = (int) v["r"].as<double>(); 7 int g = (int) v["g"].as<double>(); 8 int b = (int) v["b"].as<double>(); 9 RgbColor light_colour(r,g,b); 10 strip.SetPixelColor(light_no,light_colour); 11 light_no++; 12 } 13 Serial.println("Showing strip"); 14 strip.Show(); 15 }
#Creating a Pubic Lighting Control API with MongoDB Realm
Whilst I could set the values of the lights with the MongoDB Shell, I wanted a safe way to allow anyone to set the lights. The simplest and safest way to do that was to create an API. And whilst I could have used the Amazon API Gateway and AWS Lambda, I chose to use hosted functions in Realm instead. After all, I do work for MongoDB.
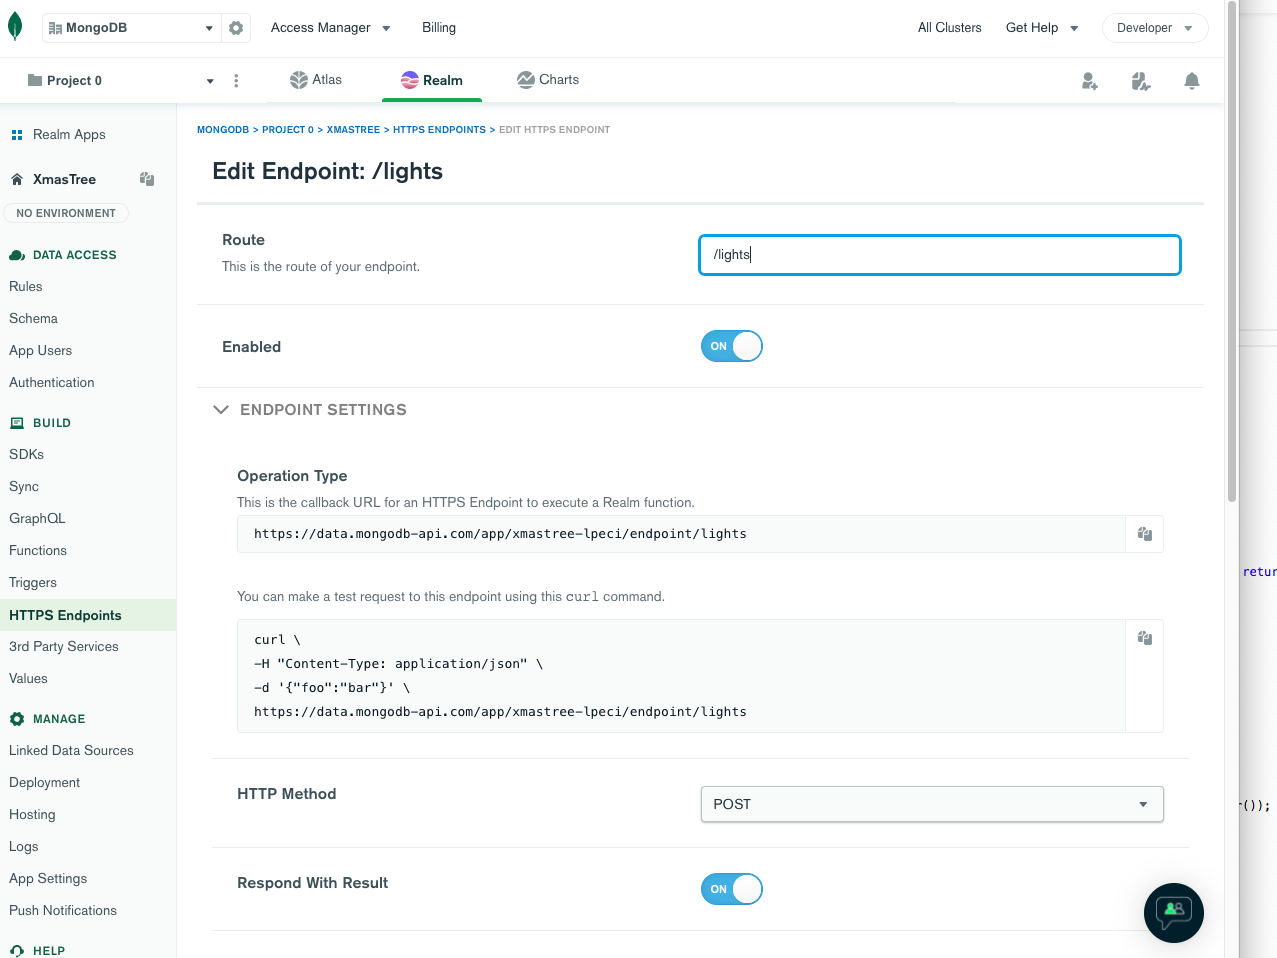
I created an HTTPS endpoint in the Realm GUI, named it /lights, marked it as requiring a POST, and that it sends a response. I then, in the second part, said it should call a function.
I then added the following function, running as system, taking care to sanitise the input and take only what I was expecting from it.
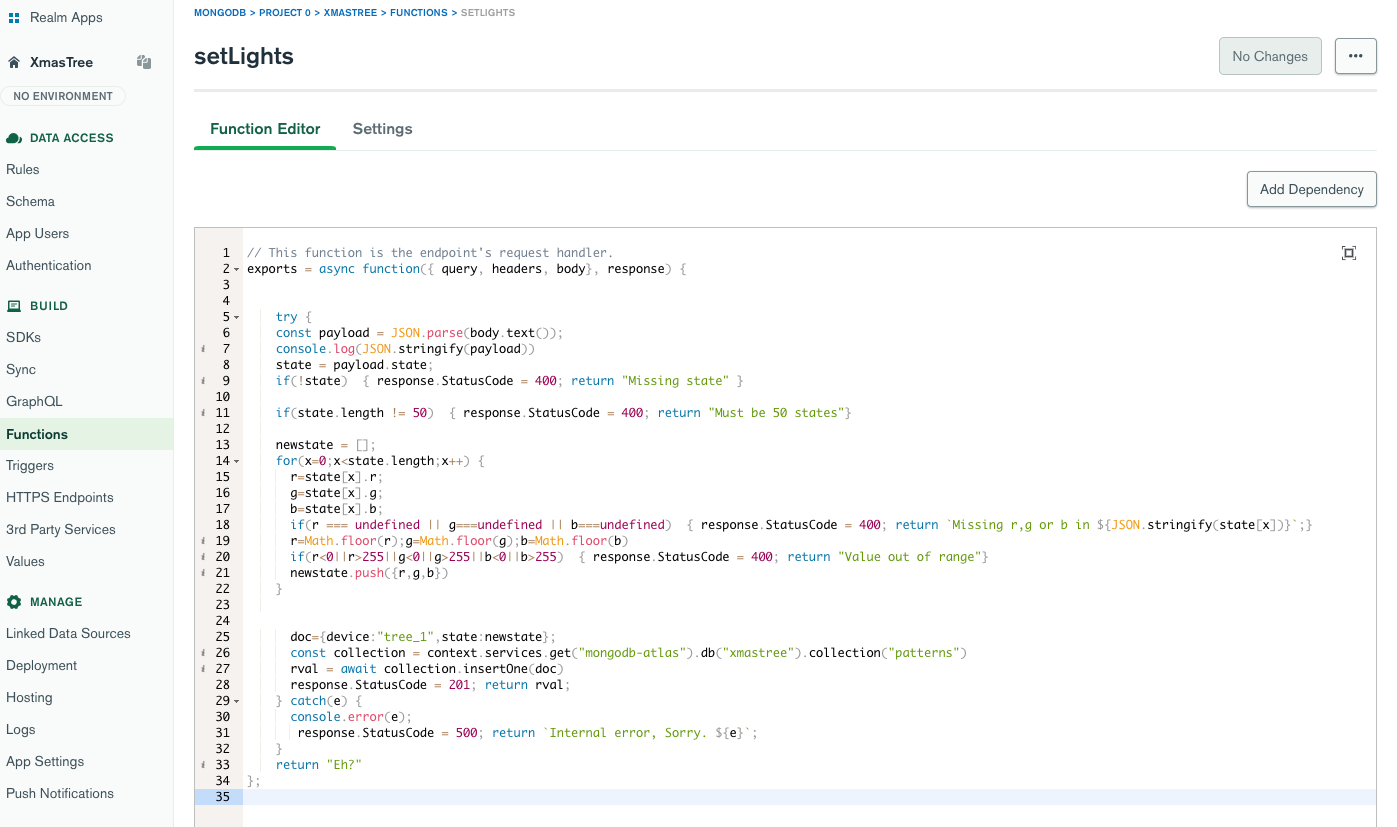
1 // This function is the endpoint's request handler. 2 exports = async function({ query, headers, body}, response) { 3 4 5 try { 6 const payload = JSON.parse(body.text()); 7 console.log(JSON.stringify(payload)) 8 state = payload.state; 9 if(!state) { response.StatusCode = 400; return "Missing state" } 10 11 if(state.length != 50) { response.StatusCode = 400; return "Must be 50 states"} 12 13 newstate = []; 14 for(x=0;x<state.length;x++) { 15 r=state[x].r; 16 g=state[x].g; 17 b=state[x].b; 18 if(r === undefined || g===undefined || b===undefined) { response.StatusCode = 400; return `Missing r,g or b in ${JSON.stringify(state[x])}`;} 19 r=Math.floor(r);g=Math.floor(g);b=Math.floor(b) 20 if(r<0||r>255||g<0||g>255||b<0||b>255) { response.StatusCode = 400; return "Value out of range"} 21 newstate.push({r,g,b}) 22 } 23 24 25 doc={device:"tree_1",state:newstate}; 26 const collection = context.services.get("mongodb-atlas").db("xmastree").collection("patterns") 27 rval = await collection.insertOne(doc) 28 response.StatusCode = 201; return rval; 29 } catch(e) { 30 console.error(e); 31 response.StatusCode = 500; return `Internal error, Sorry. ${e}`; 32 } 33 return "Eh?" 34 };
I now had the ability to change the light colours by posting to the URL shown on the web page.
#Creating the Webcam Hardware
This was all good, and if you were making a smart Christmas tree for yourself, you could stop there. But I needed to allow others to see it. I had honestly considered just an off-the-shelf webcam and a Twitch stream, but I stumbled across what must be the bargain of the decade: the AI Thinker ESP32 Cam. These are super low-cost ESP32 chips with a camera, an SD card slot, a bright LED light, and enough CPU and RAM to do some slow but capable AI inferencing—for example, to recognize faces—and they cost $10 or less. They are in two parts. The camera board is ready to plug into a breadboard, which has no USB circuitry, so you need a USB to FTDI programmer or similar and a nice USB to FTDI docking station you can use to program it. And if you just want to power it from USB as I do, this adds a reset button too.
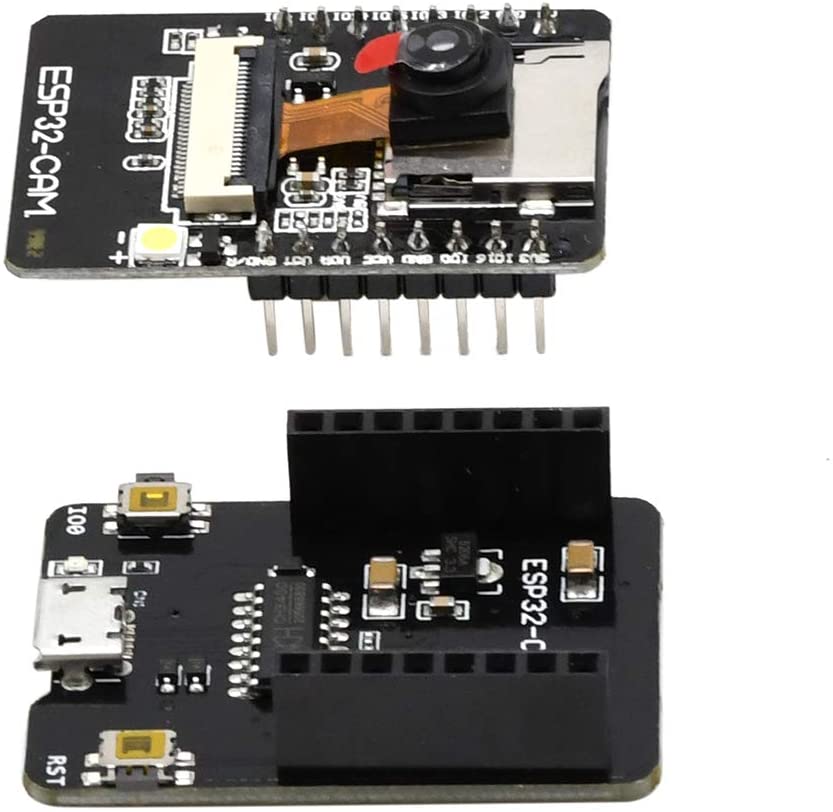
ESP CAM: 160MHz CPU, 4MB RAM + 520K Fast RAM, Wifi, Bluetooth, Camera, SD Card slot for $10
There was nothing I had to do for the hardware except clip these two components together, plug in a USB cable (being careful not to snap the USB socket off as I did the first time I tried), and mount it on a tripod.
#Writing the Webcam Software
Source Code : https://github.com/mongodb-developer/xmas_2021_tree_camera/tree/main/ESP32-Arduino/mongo_cam
Calling the Data API with a POST should have been just the same as it was in the lights, a different endpoint to insert images in a collection rather than finding them, but otherwise the same. However, this time I hit some other challenges. After a lot of searching, debugging, and reading the library source, I'd like to just highlight the difficult parts so if you do anything like this, it will help.
#Sending a Larger Payload with ESP32 HTTP POST by Using a JSONStream
#
I quickly discovered that unless the image resolution was configured to be tiny, the POST requests failed, arriving mangled at the Data API. Researching, I found there was a size limit on the size of a POST imposed by the HTTP Library. If the payload was supplied as a string, it would be passed to the TLS layer, which had a limit and only posted part of it. The HTTP layer, then, rather than send the next part, simply returned an error. This seemed to kick in at about 14KB of data.
Reading the source, I realised this did not happen if, instead of posting the body as a string, you sent a stream—a class like a filehandle or a queue that the consumer can query for data until it's empty. The HTTP library, in this case, would send the whole buffer—only 1.4KB at a time, but it would send it as long as the latency to the Data API was low. This would work admirably.
I, therefore, wrote a stream class that converted a JSONObject to a stream of i's string representation.
1 class JSONStream: public Stream { 2 private: 3 uint8_t *buffer; 4 size_t buffer_size; 5 size_t served; 6 int start; 7 int end; 8 9 public: 10 JSONStream(DynamicJsonDocument &payload ) { 11 int jsonlen = measureJson(payload); 12 this->buffer = (uint8_t*) heap_caps_calloc(jsonlen + 1, 1, MALLOC_CAP_8BIT); 13 this->buffer_size = serializeJson(payload, this->buffer, jsonlen + 1); 14 this->served = 0; 15 this->start = millis(); 16 } 17 ~JSONStream() { 18 heap_caps_free((void*)this->buffer); 19 } 20 21 void clear() {} 22 size_t write(uint8_t) {} 23 int available() { 24 size_t whatsleft = buffer_size - served; 25 if (whatsleft == 0) return -1; 26 return whatsleft; 27 } 28 int peek() { 29 return 0; 30 } 31 void flush() { } 32 int read() {} 33 size_t readBytes(uint8_t *outbuf, size_t nbytes) { 34 //Serial.println(millis()-this->start); 35 if (nbytes > buffer_size - served) { 36 nbytes = buffer_size - served; 37 } 38 memcpy(outbuf, buffer + served, nbytes); 39 served = served + nbytes; 40 return nbytes; 41 } 42 43 };
Then use this to send an ArduinoJson Object to it and stream the JSON String.
1 DynamicJsonDocument payload (1024); 2 payload["dataSource"] = "Cluster0"; 3 payload["database"] = "espcam"; 4 payload["collection"] = "frames"; 5 time_t nowSecs = time(nullptr); 6 7 char datestring[32]; 8 sprintf(datestring, "%lu000", nowSecs); 9 10 payload["document"]["time"]["$date"]["$numberLong"] = datestring; /*Encode Date() as EJSON*/ 11 12 const char* base64Image = base64EncodeImage(fb) ; 13 payload["document"]["img"]["$binary"]["base64"] = base64Image; /*Encide as a Binary() */ 14 payload["document"]["img"]["$binary"]["subType"] = "07"; 15 16 JSONStream *buffer = new JSONStream(payload); 17 18 int httpCode = https.sendRequest("POST", buffer, buffer->available());
#Allocating more than 32KB RAM on an ESP32 Using Capability Defined RAM
#
This was simple, generally, except where I tried to allocate 40KB of RAM using malloc and discovered the default behaviour is to allocate that on the stack which was too small. I, therefore, had to use heap_caps_calloc() with MALLOC_CAP_8BIT to be more specific about the exact place I wanted my RAM allocated. And of course, had to use the associated heap_caps_free() to free it. This is doubly important in something that has both SRAM and PSRAM with different speeds and hardware access paths.
#Sending Dates to the Data API with a Microcontroller and C++
A pair of related challenges I ran into involved sending data that wasn't text or numbers. I needed a date in my documents so I could use a TTL index to delete them once they were a few days old. Holding a huge number of images would quickly fill my free tier data quota. This is easy with EJSON. You send JSON of the form{ $date: { $numberLong: "xxxxxxxxx"}}where the string is the number of milliseconds since 1-1-1970. Sounds easy enough. However, being a 32-bit machine, the ESP32 really didn't like printing 64-bit numbers, and I tried a lot of bit-shifting, masking, and printing two 32-bit unsigned numbers until I realised I could simply print the 32-bit seconds since 1-1-1970 and add "000" on the end.
#Base 64 Encoding on the ESP32 to Send Via JSON
The other was how to send a Binary() datatype to MongoDB to hold the image. The EJSON representation of that is {$binary:{$base64: "Base 64 String of Data"}} but it was very unclear how to get an ESP32 to do base64 encoding. Many people seemed to have written their own, and things I tried failed until I eventually found a working library and applied what I know about allocating capability memory. That led me to the code below. This can be easily adapted to any binary buffer if you also know the length.
1 #include "mbedtls/base64.h" 2 3 const char* base64EncodeImage(camera_fb_t *fb) 4 { 5 /* Base 64 encode the image - this was the simplest way*/ 6 unsigned char* src = fb->buf; 7 size_t slen = fb->len; 8 size_t dlen = 0; 9 10 int err = mbedtls_base64_encode(NULL, 0 , &dlen, src, slen); 11 /* For a larger allocation like thi you need to use capability allocation*/ 12 const char *dst = (char*) heap_caps_calloc(dlen, 1, MALLOC_CAP_8BIT); 13 14 size_t olen; 15 err = mbedtls_base64_encode((unsigned char*)dst, dlen , &olen, src, slen); 16 17 if (err != 0) { 18 Serial.printf("error base64 encoding, error %d, buff size: %d", err, olen); 19 return NULL; 20 } 21 return dst; 22 }
#Viewing the Webcam Images with MongoDB Realm
Having put all that together, I needed a way to view it. And for this, I decided rather than create a web service, I would use Realm Web and QueryAnywhere with Read-only security rules and anonymous users.
This is easy to set up by clicking a few checkboxes in your Realm app. Then in a web page (hosted for free in Realm Hosting), I can simply add code as follows, to poll for new images (again, using the only fetch if changes trick with _id).
1 <script src="https://unpkg.com/realm-web@1.2.0/dist/bundle.iife.js"></script> 2 <script> 3 let realmapp = null; 4 let query = {}; 5 let patternquery = {}; 6 async function drawLastFrame() { 7 const frames = realmapp.currentUser.mongoClient("mongodb-atlas").db("espcam").collection("frames") 8 const order = { _id: -1 }; 9 //Get the latest frame if it's changed 10 try { 11 doc = await frames.find(query, { sort: order, limit: 1 }) 12 13 if (doc.length > 0) { 14 var video = document.getElementById("camera"); 15 video.src = 'data:image/jpeg;base64,' + doc[0].img.toString('base64'); 16 query = { _id: { "$gt": doc[0]._id } }; //Newer frames only 17 } 18 19 const patterns = realmapp.currentUser.mongoClient("mongodb-atlas").db("xmastree").collection("patterns"); 20 doc = await patterns.find(patternquery, { sort: order, limit: 1 }) 21 if (doc.length) { 22 lines = JSON.stringify(doc[0], null, 4); 23 document.getElementById("code").innerHTML = lines; 24 25 patternquery = { _id: { "$gt": doc[0]._id } }; //Newer patterns only 26 } 27 } 28 catch (e) { } 29 setTimeout(drawLastFrame, 500); 30 }; 31 32 33 async function onLoad() { 34 35 realmapp = new Realm.App({ id: "xmastree-lpeci" }); 36 const credentials = Realm.Credentials.anonymous(); 37 38 try { 39 var a = await realmapp.logIn(credentials); 40 } catch (err) { 41 alert(`Failed to log in - have you set the realmId and enabled anaonymous login and access to the collection? ${err}`); 42 return; 43 } 44 drawLastFrame(); 45 } 46 </script>
You can see this in action at https://xmastree-lpeci.mongodbstitch.com/. Use *view-source *or the developer console in Chrome to see the code. Or look at it in GitHub here.
#
#Conclusion
#
I don't have a deep or dramatic conclusion for this as I did this mostly for fun. I personally learned a lot about connecting the smallest computers to the modern cloud. Some things we can take for granted on our desktops and laptops due to an abundance of RAM and CPU still need thought and consideration. The Atlas Data API, though, worked exactly the same way as it does on these larger platforms, which is awesome. Next time, I'll use Micropython or even UIFlow Block coding and see if it's even easier.