AWS Step Functions: Integrating MongoDB Atlas, Twilio,& AWS Simple Email Service - Part 2
This is Part 2 of the AWS Step Functions overview post published a few weeks ago. If you want to get more context on the sample application business scenario, head back to read Part 1. In this post, you’ll get a deep dive into the application’s technical details. As a reference, the source code of this sample app is available on GitHub.
Setting up the Lambda functions
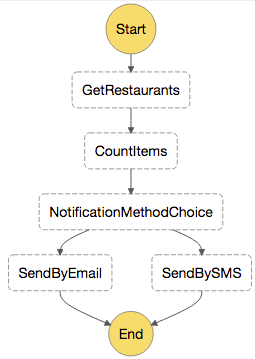
The screenshot above is the graphical representation of the state machine we will eventually be able to test and run. But before we get there, we need to set up and publish the 4 Lambda functions this Step Functions state machine relies on. To do so, clone the AWS Step Functions with MongoDB GitHub repository and follow the instructions in the Readme file to create and configure these Lambda functions.
If you have some time to dig into their respective codebases, you'll realize they're all made up of just a few lines, making it simple to embed Twilio, AWS and MongoDB APIs in your Lambda function code. In particular, I would like to point out the concise code the Get-Restaurants lambda function uses to query the MongoDB Atlas database:
db.collection('restaurants').aggregate(
  [
    { $match:
      {
        "address.zipcode": jsonContents.zipcode,
        "cuisine": jsonContents.cuisine,
        "name": new RegExp(jsonContents.startsWith)
     }
   },
   { $project:
      {
        "_id": 0,
        "name": 1,
        "address.building": 1,
        "address.street": 1,
        "borough": 1,
        "address.zipcode": 1,
        "healthScoreAverage":
          { $avg: "$grades.score" },
        "healthScoreWorst":
          { $max: "$grades.score" }
      }
    }
  ]
)
The code snippet above is a simple yet powerful example of aggregation framework queries using the $match and $project stages along with the $avg and $max accumulator operators. In a nutshell, this aggregation filters the restaurants dataset by 3 properties (zip code, cuisine, and name) in the $match stage, returns a subset of each restaurant’s properties (to minimize the bandwidth usage and query latency), and computes the maximum and average values of health scores obtained by each restaurant (over the course of 4 years) in the $project stage. This example shows how you can very easily replace SQL clauses (such as WHERE(), MAX() and AVG()) using MongoDB’s expressive query language.
Creating the Step Functions state machine
Once you are done with setting up and configuring these Lambda functions, it's time to finally create our Step Functions state machine.
AWS created a JSON-based declarative language called the Amazon States Language, fully documented on the Amazon States Language specification page. A Step Functions state machine is essentially a JSON file whose structure conforms to this new Amazon States Language. While you don’t need to read its whole specification to understand how it works, I recommend reading the AWS Step Functions Developer Guide to understand its main concepts and artifacts.
For now, let's go ahead and create our WhatsThisRestaurantAgain state machine. Head over to the Create State Machine page in AWS Step Functions and give your new state machine a name (such as WhatsThisRestaurantAgain).
Next, copy and paste the following JSON document (also available on GitHub) into the Code text editor (at the bottom of the Create State Machine page):
{
    "Comment": "A state machine showcasing the use of MongoDB Atlas to notify a user by text message or email depending on the number of returned restaurants",
    "StartAt": "GetRestaurants",
    "States": {
        "GetRestaurants": {
            "Type": "Task",
            "Resource": "",
            "ResultPath": "$.restaurants",
            "Next": "CountItems"
        },
        "CountItems": {
            "Type": "Task",
            "Resource": "",
            "InputPath": "$.restaurants",
            "ResultPath": "$.count",
            "Next": "NotificationMethodChoice"
        },
        "NotificationMethodChoice": {
            "Type": "Choice",
            "Choices": [
                {
                    "Variable": "$.count",
                    "NumericGreaterThan": 1,
                    "Next": "SendByEmail"
                },
                {
                    "Variable": "$.count",
                    "NumericLessThanEquals": 1,
                    "Next": "SendBySMS"
                }
            ],
            "Default": "SendByEmail"
        },
        "SendByEmail": {
            "Type": "Task",
            "Resource": "",
            "End": true
        },
        "SendBySMS": {
            "Type": "Task",
            "Resource": "",
            "End": true
        }
    }
}
Once you’re done pasting this JSON document, press the Refresh button of the Preview section right above the Code editor and... voilà! The state machine now shows up in its full, visual glory:
We’re not quite done yet. But before we complete the last steps to get a fully functional Step Functions state machine, let me take a few minutes to walk you through some of the technical details of my state machine JSON file.
Note that 4 states are of type "Task" but that their Resource attributes are empty. These 4 "Task" states represent the calls to our 4 Lambda functions and should thus reference the ARNs (Amazon Resource Names) of our Lambda functions. You might think you have to get these ARNs one by one—which might prove to be tedious—but don't be discouraged; AWS provides a neat little trick to get these ARNs automatically populated!
Simply click inside the double quotes for each Resource attribute and the following drop-down list should appear (if it doesn't, make sure you are creating your state machine in the same region as your Lambda functions):

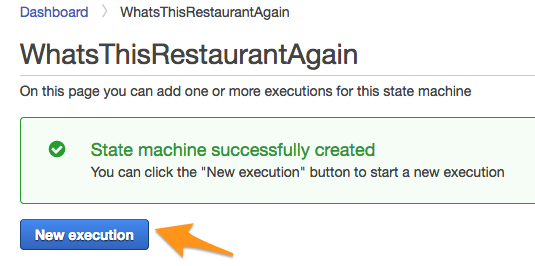
Once you have filled out the 4 empty Resource attributes with their expected values, press the Create State Machine button at the bottom. Last, select the IAM role that will execute your state machine (AWS should have conveniently created one for you) and press OK:

On the page that appears, press the New execution button:
Enter the following JSON test document (with a valid emailTo field) and press Start Execution:
{
    "startsWith": "M",
    "cuisine": "Italian",
    "zipcode": "10036",
    "phoneTo": "+15555555555",
    "firstnameTo": "Raphael",
    "emailTo": "raphael@example.com",
    "subject": "List of restaurants for {{firstnameTo}}",
}
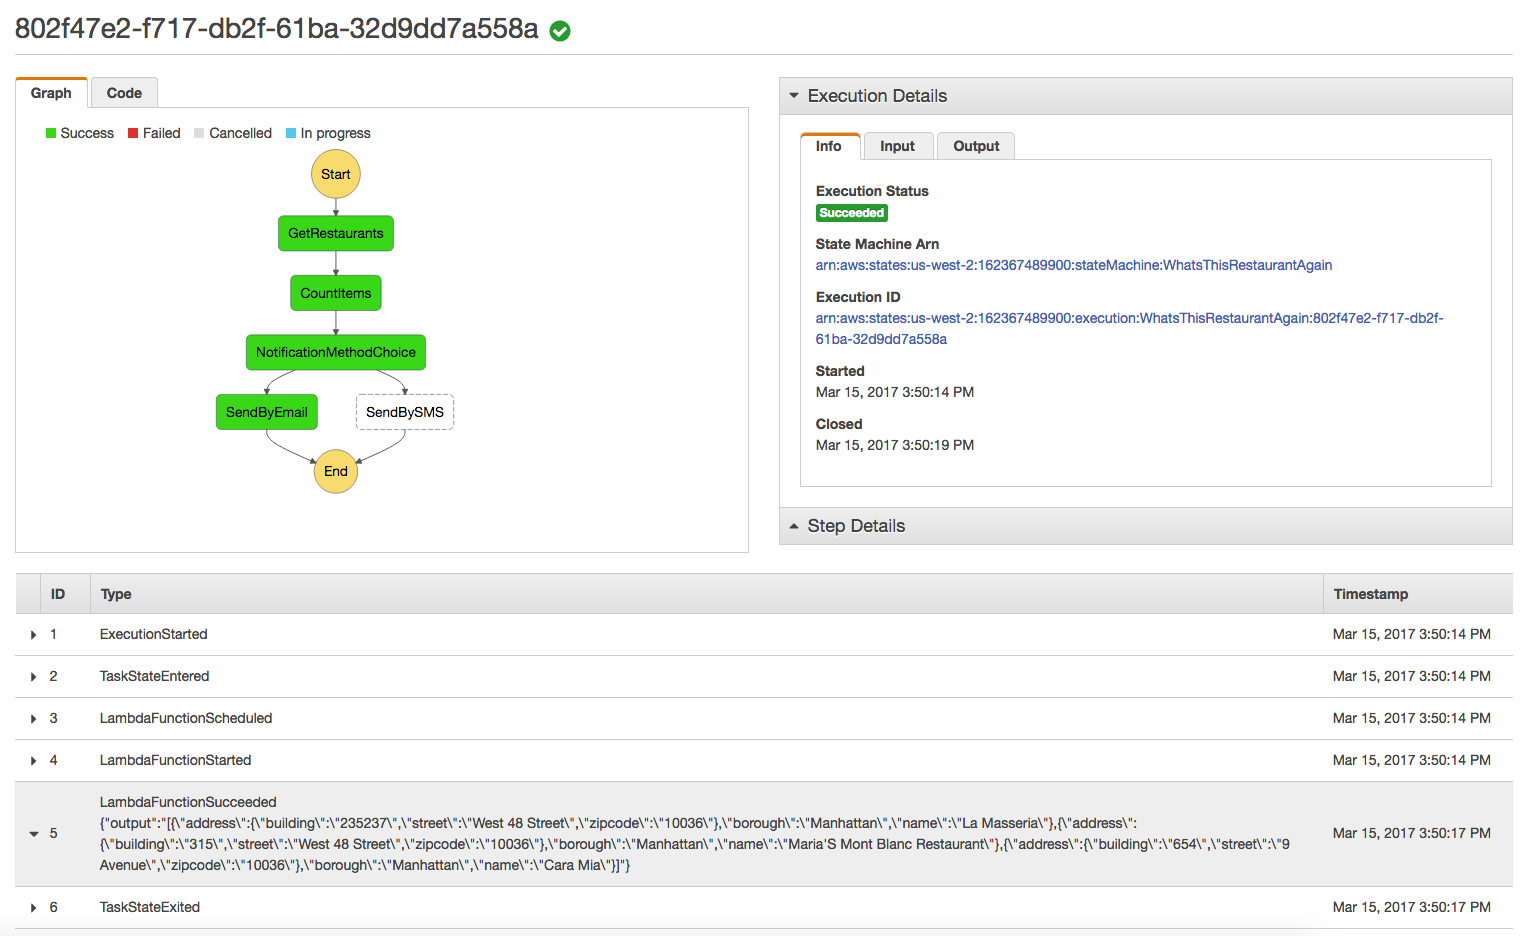
If everything was properly configured, you should get a successful result, similar to the following one:
If you see any red boxes (in lieu of a green one), check CloudWatch where the Lambda functions log their errors. For instance, here is one you might get if you forgot to update the emailTo field I mentioned above:

And that's it (I guess you can truly say we’re "done done" now)! You have successfully built and deployed a fully functional cloud workflow that mashes up various API services thanks to serverless functions.
For those of you who are still curious, read on to learn how that sample state machine was designed and architected.
Design and architecture choices
Let's start with the state machine design:
The GetRestaurants function queries a MongoDB Atlas database of restaurants using some search criteria provided by our calling application, such as the restaurant's cuisine type, its zip code and the first few letters of the restaurant's name. It retrieves a list of matching restaurants and passes that result to the next function (CountItems). As I pointed out above, it uses MongoDB's aggregation framework to retrieve the worst and average health score granted by New York's Health Department during its food safety inspections. That data provides the end user with information on the presumed cleanliness and reliability of the restaurant she intends to go to. Visit the aggregation framework documentation page to learn more about how you can leverage it for advanced insights into your data.
The CountItems method counts the number of the restaurants; we'll use this number to determine how the requesting user is notified.
If we get a single restaurant match, we'll send the name and address of the restaurant to the user's cell phone using the SendBySMS function.
However, if there's more than one match, it's probably more convenient to display that list in a table format. As such, we'll send an email to the user using the SendByEmail method.
At this point, you might ask yourself: how is the data passed from one lambda function to another?
As it turns out, the Amazon States Language provides developers with a flexible and efficient way of treating inputs and outputs. By default, the output of a state machine function becomes the input of the next function. That doesn't exactly work well for us since the SendBySMS and SendByEmail methods must know the user's cell phone number or email address to properly work. An application that would like to use our state machine would have no choice but to pass all these parameters as a single input to our state machine, so how do we go about solving this issue?
Fortunately for us, the Amazon States Language has the answer: it allows us to easily append the result of a function to the input it received and forward the concatenated result to the next function. Here's how we achieved this with our GetRestaurants function:
"GetRestaurants": {
    "Type": "Task",
    "Resource": "arn:aws:lambda:REGION:ACCOUNT_ID:function:FUNCTION_NAME",
    "ResultPath": "$.restaurants",
    "Next": "CountItems"
}
Note the ResultPath attribute above where we instruct Step Functions to append the result of our GetRestaurants task (an array of matching restaurants) to the input it received, whose structure is the test JSON document I mentioned above (duplicated here for reading convenience):
{
    "startsWith": "M",
    "cuisine": "Italian",
    "zipcode": "10036",
    "phoneTo": "+15555555555",
    "firstnameTo": "Raphael",
    "emailTo": "raphael@example.com",
    "subject": "List of restaurants for {{firstnameTo}}"
}
This input contains all the information my state machine might need, from the search criteria (startsWith, cuisine, and zipcode), to the user's cell phone number (if the state machine ends up using the SMS notification method), first name, email address and email subject (if the state machine ends up using the email notification method).
Thanks to the ResultPath attribute we set on the GetRestaurants task, its output has a structure similar to the following JSON document (additional data in bold):
{
  "firstnameTo": "Raphael",
  "emailTo": "raphael@example.com",
  "subject": "List of restaurants for {{firstnameTo}}",
 <strong>"restaurants": [
  {
    "address": {
      "building": "235-237",
      "street": "West 48 Street"
    },
    "borough": "Manhattan",
    "name": "La Masseria"
  },
  {
    "address": {
      "building": "315",
      "street": "West 48 Street"
    },
    "borough": "Manhattan",
    "name": "Maria'S Mont Blanc Restaurant"
  },
  {
    "address": {
      "building": "654",
      "street": "9 Avenue"
    },
    "borough": "Manhattan",
    "name": "Cara Mia"
  }
]</strong>
}
As expected, the restaurants sub-document has been properly appended to our original JSON input. That output becomes by default the input for the CountItems method. But, we don't want that function to have any dependency on the input it receives. Since it's a helper function, we might want to use it in another scenario where the input structure is radically different. Once again, the Amazon States Language comes to the rescue with the optional InputPath parameter. Let's take a closer look at our CountItems task declaration in the state machine’s JSON document:
"CountItems": {
    "Type": "Task",
    "Resource": "arn:aws:lambda:REGION:ACCOUNT_ID:function:FUNCTION_NAME",
    "InputPath": "$.restaurants",
    "ResultPath": "$.count",
    "Next": "NotificationMethodChoice"
}
By default, the InputPath value is the whole output of the preceding task (GetRestaurants in our state machine). The Amazon States Language allows you to override this parameter by explicitly setting it to a specific value or sub-document. As you can see in the JSON fragment above, this is exactly what I have done to only pass an array of JSON elements to the CountItems Lambda function (in my case, the array of restaurants we received from our previous GetRestaurants function), thereby making it agnostic to any JSON schema. Conversely, the result of the CountItems task is stored in a new count attribute that serves as the input of the NotificationMethodChoice choice state that follows:
"NotificationMethodChoice": {
    "Type": "Choice",
    "Choices": [
        {
            "Variable": "$.count",
            "NumericGreaterThan": 1,
            "Next": "SendByEmail"
        },
        {
            "Variable": "$.count",
            "NumericLessThanEquals": 1,
            "Next": "SendBySMS"
        }
    ],
    "Default": "SendByEmail"
}
The logic here is fairly simple: if the restaurants count is greater than one, the state machine will send an email message with a nicely formatted table of the restaurants to the requesting user’s email address. If only one restaurant is returned, we’ll send a text message to the user’s phone number (using Twilio’s SMS API) since it’s probably faster and more convenient for single row results (especially since the user might be on the move while requesting this piece of information). Note that my JSON "code" actually uses the NumericLessThanEquals operator to trigger the SendBySMS task and not the Equals operator as it really should. So technically speaking, even if no result is returned from the GetRestaurants task, the state machine would still send a text message to the user with no restaurant information whatsoever! I’ll leave it up to you to fix this intentional bug.
Next steps
In this post, I showed you how to create a state machine that orchestrates calls to various cloud services and APIs using a fictitious restaurant search and notification scenario. I hope you enjoyed this tutorial explaining how to deploy and test that state machine using the AWS console. Last, I went through various design and architecture considerations, with a focus on data flow abilities available in Step Functions.
If you haven’t done so already, sign up for MongoDB Atlas and create your free M0 MongoDB cluster in minutes.
Next, you can get more familiar with AWS Lambda development and deployment by following our 101 Lambda tutorial.
If you already have some experience with AWS Lambda, Developing a Facebook Chatbot with AWS Lambda and MongoDB Atlas will walk through a richer use case.
As a last step, you might be interested in Step Functions integration with API Gateway to learn how to call a state machine from an external application.
About the Author - Raphael Londner
Raphael Londner is a Principal Developer Advocate at MongoDB, focused on cloud technologies such as Amazon Web Services, Microsoft Azure and Google Cloud Engine. Previously he was a developer advocate at Okta as well as a startup entrepreneur in the identity management space. You can follow him on Twitter at @rlondner.