Sharding is a method for distributing data across multiple machines, enabling horizontal scaling (as opposed to vertical scaling).
Vertical scaling refers to increasing the power of a single machine or single server through a more powerful CPU, increased RAM, or increased storage capacity. If physical limitations were not an issue, vertical scaling would be the method of choice due to its simplicity. In real life, no single machine can handle large modern-day workloads.
The solution is horizontal scaling. Also known as scale-out, it refers to adding nodes to share the data set and load. Horizontal scaling allows for near-limitless scaling to handle big data and intense workloads.
How Does Sharding Work?
Shards, Routers, and Config Servers
In MongoDB, a sharded cluster consists of several:
- shards
- routers
- config server replica sets
A shard is a replica set that contains a subset of a sharded collection (also known as chunks). A replica set consists of one or more mongod nodes that all maintain the same data set.
Replica sets provide high availability. Sharding allows us to partition the data across multiple replica sets and, as a result, boost the database resources.
The router (or mongos)acts as a query router for client applications, handling both read and write operations. The router caches the metadata from the config server in order to properly route requests to the relevant shard or shards.
The config servers store all the metadata for a sharded cluster. The metadata include state and organization for all data and components within the sharded cluster.
In its simplest configuration with a single shard, a sharded cluster might look like this:
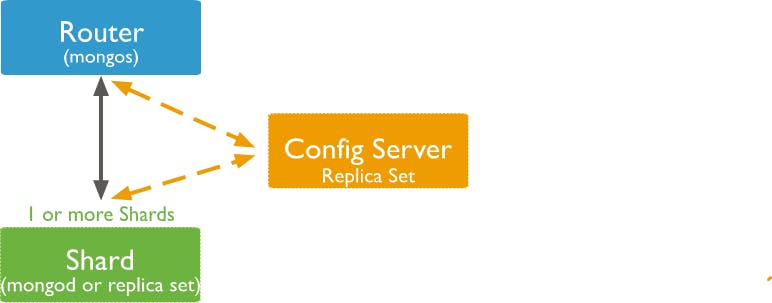
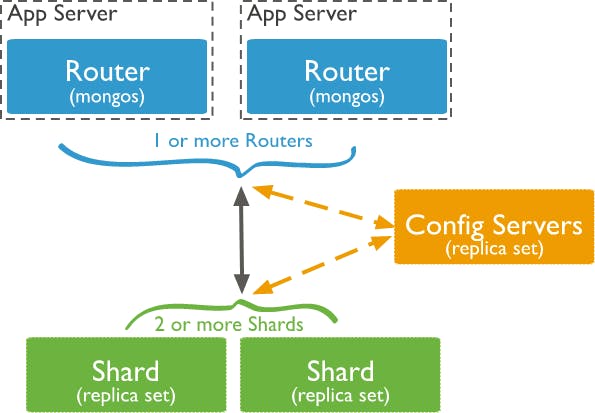
This deployment isn’t production-ready, but it works for a test environment. In production environments, we strongly recommend an implementation with multiple shards/mongos routers:
What are the Benefits of Sharding?
Sharding allows you to scale your database to handle increased loads to a nearly unlimited degree. It does this by increasing read/write throughput, storage capacity, and high availability. Let’s look at each of those in a little more detail:
Increased read/write throughput: By distributing the data set across multiple shards, both read and write operation capacity are increased as long as those operations are confined to a single shard. This depends heavily on how you configure the shard key for each sharded collection.
Increased storage capacity: Similarly, by increasing the number of shards, you can also increase overall total storage capacity. This allows near-infinite scalability.
High availability: Since each shard is a replica set, every piece of data is replicated. Since the data is distributed, even if an entire shard becomes unavailable, the database as a whole still remains partially functional for reads and writes from the remaining shards.
Shard Keys and Chunks
Shard Keys
Sharding a collection requires the user to decide on the distribution strategy of the collection content across the available shards. MongoDB uses the shard key to distribute the collection’s documents across shards by assigning a range of values to a shard.
Shard keys are based on fields inside each document. The values in those fields will decide on which shard the document will reside, according to the shard ranges and amount of chunks. This data is stored and kept in the config server replica set.
Each shard key will require an index or auto-build one, as part of the sharding command, if the collection is empty and the required index is missing.
The shard key has a direct impact on the cluster’s performance and can lead to bottlenecks for your application access patterns. Use the following documentation to choose the best shard key for you.
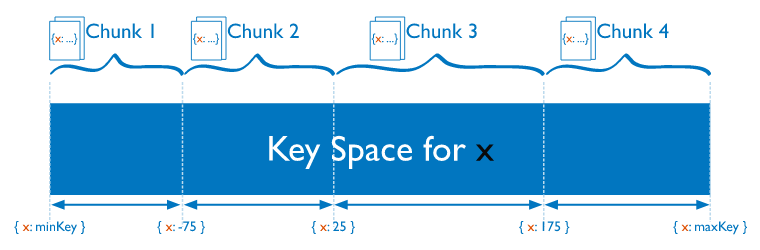
Chunks
Chunks are logical groups of documents which move across shards based on the sharding range mapping at a specific point in time. Each chunk has an inclusive lower and exclusive upper range based on the shard key.
Once a chunk reaches a specific size or when the workload requires so, the chunk is split into two. A balancer component will automatically balance the chunks across shards to keep them as equally distributed as possible.
How to Implement Sharding
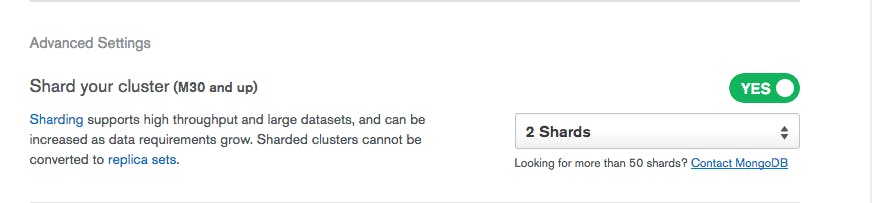
The easiest, most convenient, and most cost-effective way to deploy and manage a sharded cluster is via MongoDB Atlas, the Database-as-a-Service that simplifies sharded cluster implementation.
All you need to do is turn it on:
Why Use MongoDB Atlas?
- Deploy your sharded cluster in minutes with a few simple clicks. This allows you to span your cluster across regions and cloud providers as well as build a single cluster to cover across globe network.
- Scale in and out by a single command with unified monitoring and performance advisory tools.
- It’s cost-effective as you pay only for the shards infrastructure, and not for config servers or routers.
- It offers built-in enterprise-grade security and encryption for your sharded cluster access and auditing.
- No-downtime software upgrades and Operating System patching is done for you.
If you want to do it yourself, follow these instructions. Make sure to replace anything between < and > with the relevant values for your setup. We will set up a config server and shard(s), both on three-node replica sets, as well as a mongos server.
Let’s get started.
1. Set Up the Config Server
Each config server replica set can have any number of mongod processes (up to 50), with the following exceptions: no arbiters and no zero-priority members. For each of those, you will need to start it with the --configsvr option. For example:
mongod --configsvr --replSet <configReplSetName> --dbpath <path> --port 27019 --bind_ip localhost,<hostname(s)|ip address(es)>From there, connect to just one of the replica set members:
mongo --host <hostname> --port 27019And run rs.initiate() on just one of the replica set members:
rs.initiate(
  {
    _id: "<configReplSetName>",
    configsvr: true,
    members: [
      { _id : 0, host : "<cfg1.example.net:27019>" },
      { _id : 1, host : "<cfg2.example.net:27019>" },
      { _id : 2, host : "<cfg3.example.net:27019>" }
    ]
  }
)
With the config server replica set up and running, we can create the shards.
2. Set Up Shards
As mentioned before, each shard is a replica set in and of itself. This process will be similar to the config servers, but using the --shardsvr option. Make sure to use a different replica set name for each shard.
mongod --shardsvr --replSet <shardReplicaSetNamereplSetname> --dbpath <path> --port 27018 --bind_ip <cluster hostname(s)|ip address(es)>From there, connect to just one of the replica set members:
mongo --host <hostname> --port 27018And run rs.initiate() on just one of the replica set members. Make sure you leave out the --configsvr option:
rs.initiate(
  {
    _id: "<shardReplicaSetNamereplSetnamereplSetName>",
    members: [
      { _id : 0, host : "<shard-host1.example.net:2701827019>" },
      { _id : 1, host : "<shard-host2.example.net:2701827019>" },
      { _id : 2, host : "<shard-host3.example.net:2701827019>" }
    ]
  }
)
3. Start the mongos
Finally, set up the mongosand point it at your config servers replica set:
mongos --configdb
<configReplSetName>/<cfg1.example.net:27019>,<cfg2.example.net:27019>,<cfg3.example.net:27019> --bind_ip localhost,<cluster hostname(s)|ip address(es)>
In a production environment, more than one mongos must be deployed to avoid a bottleneck and ensure high availability. Usually, starting with at least three mongos instances is a good practice.
4. Configure and Turn On Sharding for the Database
Connect to your mongos:
mongo --host <hostname> --port 27017And add your shards to the cluster. Do this once for each shard:
sh.addShard( "<shardReplicaSetName>/<shard-host1.example.net:27018>,<shard-host2.example.net:27018>,<shard-host3.example.net:27018>")Enable sharding on your database:
sh.enableSharding("<database>")Finally, shard your collection using the sh.shardCollection() method. You can do this either via hashed sharding, which will spread your data evenly across shards...
sh.shardCollection("<database>.<collection>", { <shard key field> : "hashed" , ... } )...or via range-based sharding, which allows you to optimize distribution across shards based on the shard key values. For certain sets of data, this will make queries across ranges of data more efficient. The command is as follows:
sh.shardCollection("<database>.<collection>", { <shard key field> : 1, ... } )And that’s it! You’ve now set up your first sharded cluster. Any application interaction from now on should be done via the routers (mongos instances) only.
Considerations Before Sharding
Here are a few points to consider before setting up a sharded cluster:
No (easily) going back: The first and most minor is that once a collection has been sharded, there is no straightforward way to “unshard” it. It is worth considering whether the other limitations are necessary for the application’s current and future workload.
Broadcast operations: If a
mongosrouter is unable to determine if a query can be handled by one specific shard, it broadcasts that query to every shard in the cluster. Once each shard has responded, themongosthen merges the shard responses and returns a result to the client application. This becomes extremely expensive. As much as possible, it is important to mitigate this through proper configuration of the shard key. For more information, check out performance best practices on the MongoDB blog.Complexity of administration: With multiple servers and components to manage comes increased complexity on the infrastructure side. This can be mitigated entirely through the use of MongoDB Atlas or partially mitigated through the use of orchestration tools such as our Kubernetes Operator or Ops Manager automation.
Multiple routers: Can reduce latency for client applications, but also increase load on the config servers.
Chunk management: The piece of data which lives on a shard is placed in a chunk. Over time, chunks grow and get split at different rates, and this requires rebalancing. Typically, this is handled automatically by the balancer which runs on the config server; in some cases, this will require manual maintenance. Faulty chunk management may result in performance impact and data skew between the shards.
The MongoDB documentation has a full list of restrictions that should be consulted before deploying your first sharded cluster.
Summary
We’ve covered the basics of sharding, its benefits and limitations, and how to get started with your first sharded cluster. For more information, check out the sharding manual or sharding methods in the MongoDB documentation.
FAQs
What is MongoDB sharding?
Sharding is the process of partitioning data across multiple replica sets (hosts), enabling horizontal scaling.
How does MongoDB sharding work?
In MongoDB, a sharded cluster consists of shards, routers, and config servers. The data is distributed across the shards, the routers handle client requests, and the config servers maintain the overall shard state.
What are shard keys in MongoDB?
Shard keys are based on fields inside each document. The values in those fields will decide on which shard the document will reside, according to the shard ranges and amount of chunks. This data is stored and kept in the config server replica set.
Each shard key will require an index or auto-build one, as part of the sharding command, if the collection is empty and the required index is missing. The shard key has a direct impact on the cluster performance and could lead to bottlenecks for your application access patterns. Use the following documentation to choose the best shard key for you.