Turning MongoDB into a Predictive Database
There’s a growing interest in artificial intelligence (AI) and machine learning (ML) in the business world. The predictive capabilities of ML/AI enable rapid insights from patterns detected at rates faster than manual analysis. Businesses realize that this can lead to increased profits, reduced costs, and accelerated innovation. Although businesses both large and small can benefit from the power of AI, implementing a predictive analytics project can be both complex and time-consuming.
MongoDB, Inc. (NASDAQ: MDB), the leading, modern general purpose database platform, and MindsDB, the open-source machine learning platform that brings automated machine learning to the database, established a technology partnership to advance machine learning innovation. This collaboration aims to enhance the ability to streamline predictive capabilities for data science and data engineering teams within organizations to solve real-world business challenges.
What is the best approach?
Once you have identified the initial ML projects you’d like to focus on, choosing the right tools and methodologies can help speed up the time it takes to build, train, and optimize models. Model selection and feature engineering can be time consuming and difficult if you aren’t aware of the specific dimensions the ML model is going to train on. AutoML models excel at testing a wide variety of different algorithms to model a hypothesis of interest.
Existing state-of-the-art AutoML frameworks provide methods to optimize performance including adjusting hyper parameters (such as the learning rate or batch size). The MindsDB AutoML framework extends beyond most conventional automated systems of hyper parameter tuning and enables novel upstream automation of data cleaning, data pre-processing, and feature engineering. To empower users with transparent development, the framework encompasses explainability tools, enables processing for complex data types (NLP, time series, language modeling, and anomaly detection), and gives users customizability by allowing imported models of their choice.
MindsDB also generates predictions at the data layer—an additional, significant advancement that accelerates development speed. Generating predictions directly in MongoDB Atlas with MindsDB AI Tables gives you the ability to consume predictions as regular data, query these predictions, and accelerate development speed by simplifying deployment work-flows.
Getting started with MindsDB
We suggest starting with http://cloud.mindsdb.com for a cloud managed version of MindsDB .
MindsDB is an open source project (http://github.com/mindsdb/mindsdb), so you can alternatively install it on your machine and run it locally. For simplicity, we recommend the docker installation described below:
Install MindsDB using Docker
- First, check that you have docker installed by running:
docker run hello-world
- To pull the image, run the following command:
docker pull mindsdb/mindsdb
- Then, run the command below to start the container:
docker run -p 47334:47334 -p 47336:47336 mindsdb/mindsdb
If docker is not an option, you can follow our docs on how to install MindsDB locally. (https://docs.mindsdb.com/)
Setting up the connection
Connecting MindsDB to MongoDB can be done in two ways: by using MindsDB Studio (the GUI) or by using Mongo clients (the terminal). Currently, integration works by accessing MongoDB through MindsDB’s MongoDB API as a new data source. More information about connecting to MongoDB can be found here.
Use the Mongo shell to connect to MindsDB’s MongoDB API. Please note that you must have Mongo shell version ≥3.6 to use the MindsDB MongoDB API. If you are following this tutorial using MindsDB Cloud you can skip the section about config.json.
There is a default configuration setup before starting the MongoDB API. The Mongo host will be the MindsDB Mongo API which is defined inside the host key as 127.0.0.1. Please find below the config.json example.
{
 "api": {
  "http": {
   "host": "127.0.0.1",
   "port": "47334"
  },
  "mysql": {}
  "mongodb": {
   "host": "127.0.0.1",
   "port": "47336",
   "user": "mindsdb",
   "password": "",
   "database": "mindsdb"
  }
 },
 "config_version": "1.4",
 "debug": true,
 "integrations": {},
 "storage_dir": "/mindsdb_storage"
}
The location of the above config.json file can be found in the first output line of the log when MindsDB Server is started as a Configuration file value. If you want to change the host, default username or include password, you can make the changes there. To connect to MindsDBs via GUI:
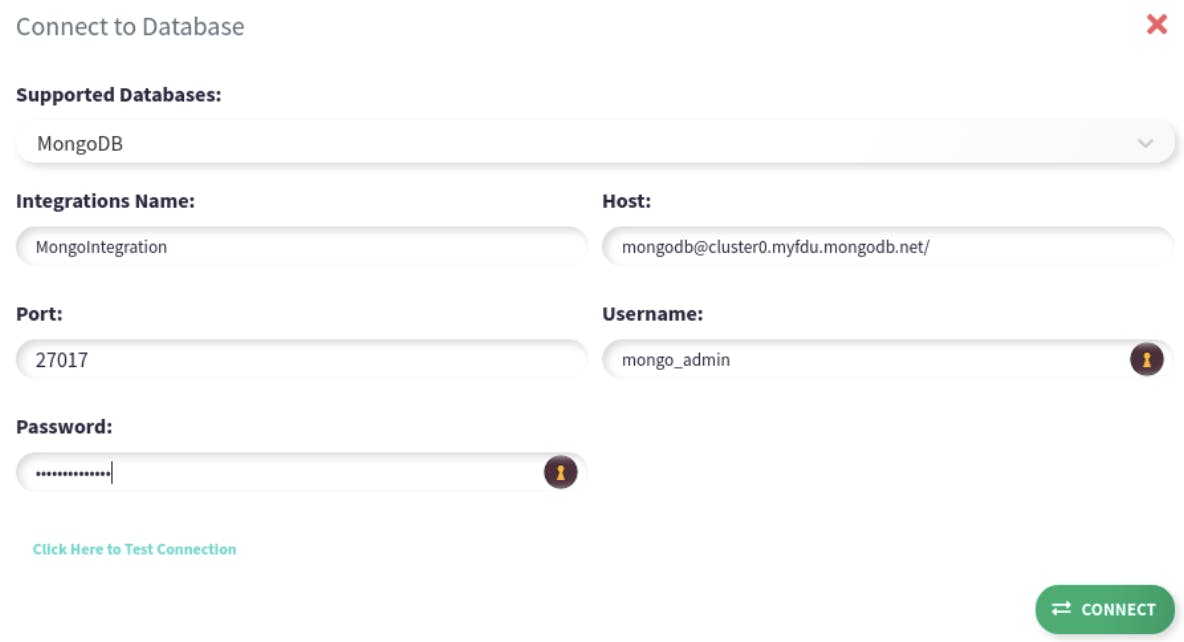
We can use MindsDB Studio to create a connection between MindsDB and MongoDB to access the data we wish to train our model on. Visit http://127.0.0.1:47334/ or http://cloud.mindsdb.com/ from your favorite web browser to access the Studio. From the menu located on the left, select Database Integration. Then, select ADD DATABASE. In the connect to Database window:
-
Select MongoDB as the Supported Database
-
Add the subsequent information as Mongo host, port, username and password
Now, we have successfully integrated with the MongoDB database. The next step is to use Mongo-client to connect to MindsDBs Mongo API and train models.
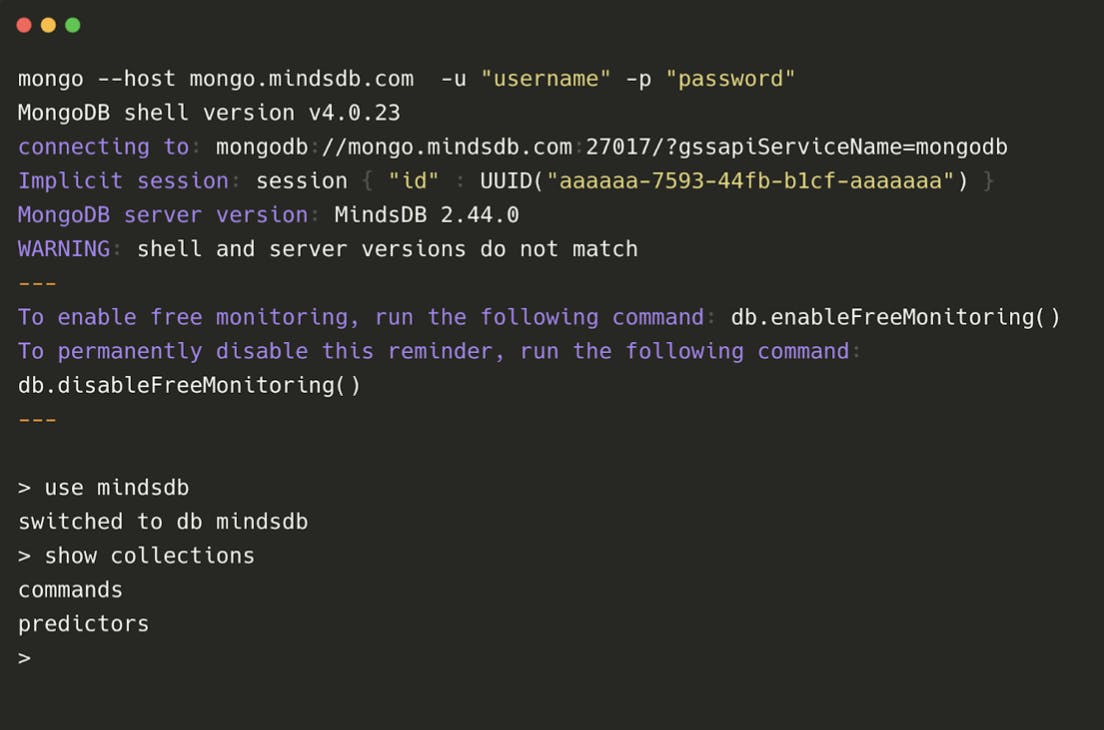
To connect to MindsDBs Mongo API for local connection run:
mongo --host 127.0.0.1 -u "username" -p "password"
If you are using MindsDB cloud, you need to use the username/password to connect to the MindsDB Mongo API.
mongo --host mongo.cloud.mindsdb -u "cloud_username" -p "cloud_password"
Then use MindsDBs database and list collections:
use mindsdb
show collections
Training a new Machine Learning Model using MQL
We will leverage the power of Mongo Query Language (MQL) and MindsDB to train a model. The goal of the model is to predict the strength of a concrete mix, with input columns such as the age, amount of water used, types, and quantities of additives used to make the mix stronger. The dataset can be downloaded from Kaggle and represents a potential business use case in everyday construction projects to optimize the strength of a mix while minimizing the amount of material used—a goal that saves on costs without neglecting function. You can follow this tutorial with your data inside Mongodb or simply just import the csv file in a collection called material_strength. Also, you can get the exported collection from the above data on this URL.
To train a new model, we need to call the insert() function on the mindsdb.predictors collection. Notably, the following information must be included:
db.predictors.insert({
 'name': 'strength',
 'predict': 'concrete_strength',
 'connection': 'MongoIntegration',
 'select_data_query':{
  'database': 'test_data',
  'collection': 'material_strength',
  'find': {}
 }
})
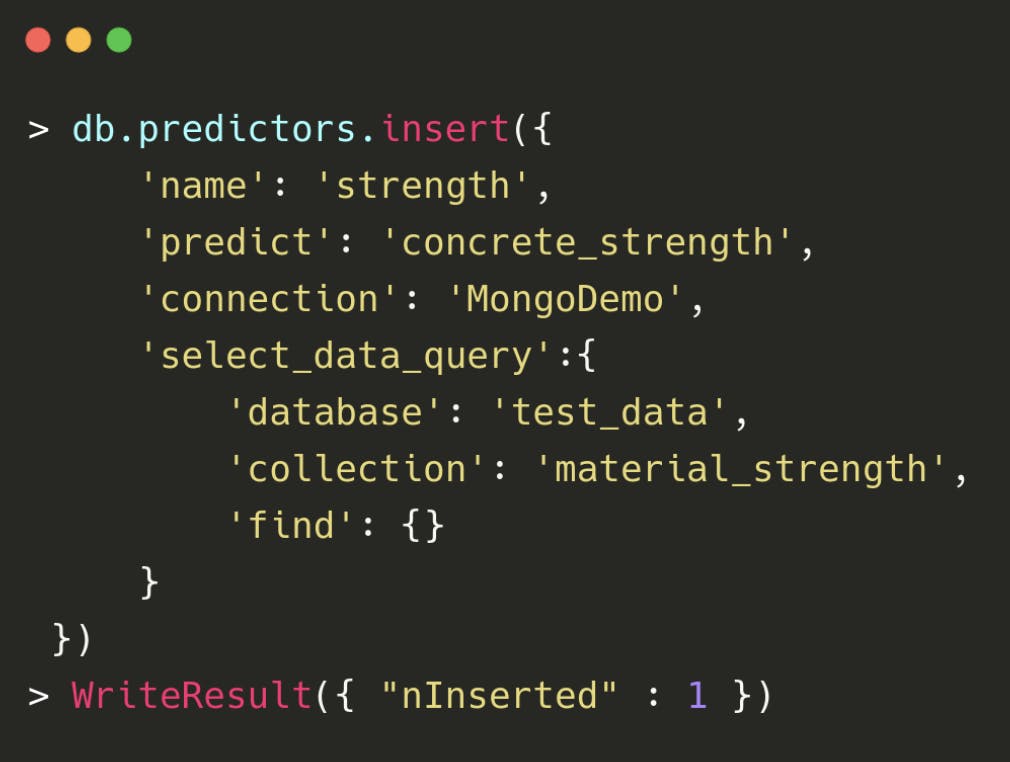
The ‘name’ is simply the model name, ‘predict’ is the feature that we aim to predict, and ‘connection’ is the name of the MongoDB connection we have created using MindsDB Studio. Inside the select_data_query we should provide the name of the database, collection and find() function to select the data.
Once you enter this information, MindsDB begins the training process. To verify that the training has been completed, you can use the find() command to check the model status inside mindsdb.predictors collection e.g.:
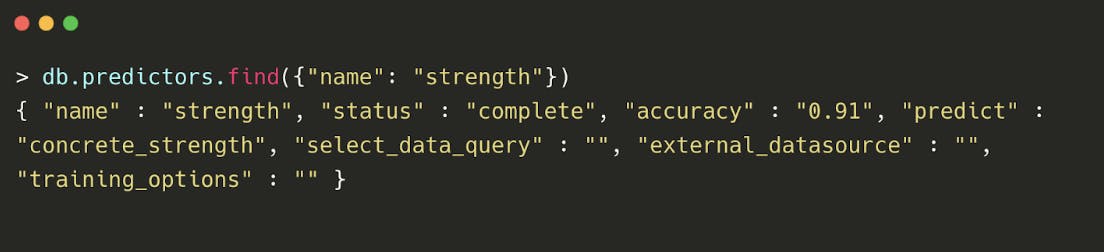
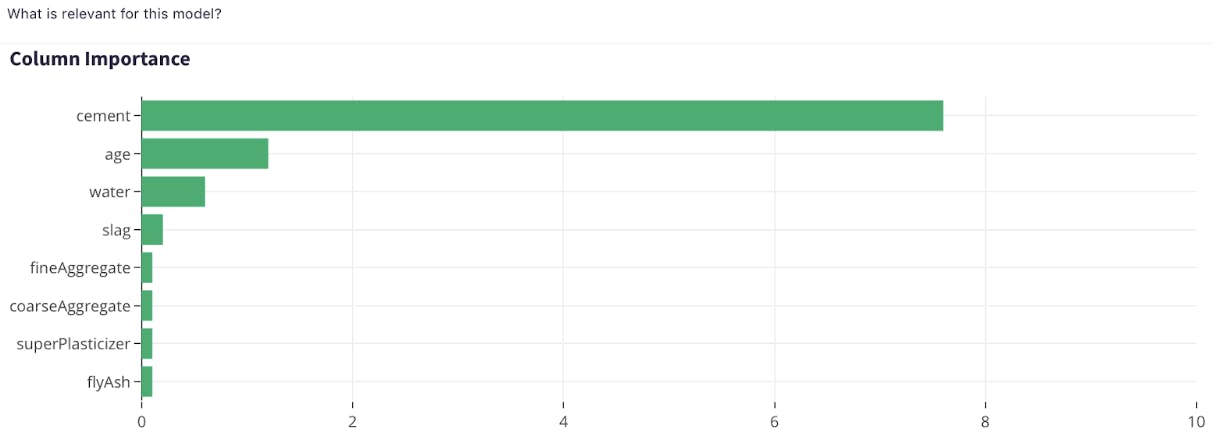
Successful training will return a ‘status’: ‘complete’ notification. MindsDB Studio provides additional useful information to go beyond predictions and explain the results. The below figure refers to feature importances, automatically calculated and displayed to reveal which columns of your data likely matter for predictive strength. The following information can be obtained from MindsDB studio by selecting the preview option on your trained model.
Moreover, the preview option also provides us with a confusion matrix to help us evaluate the performance of our model by buketizing true and predicted values.
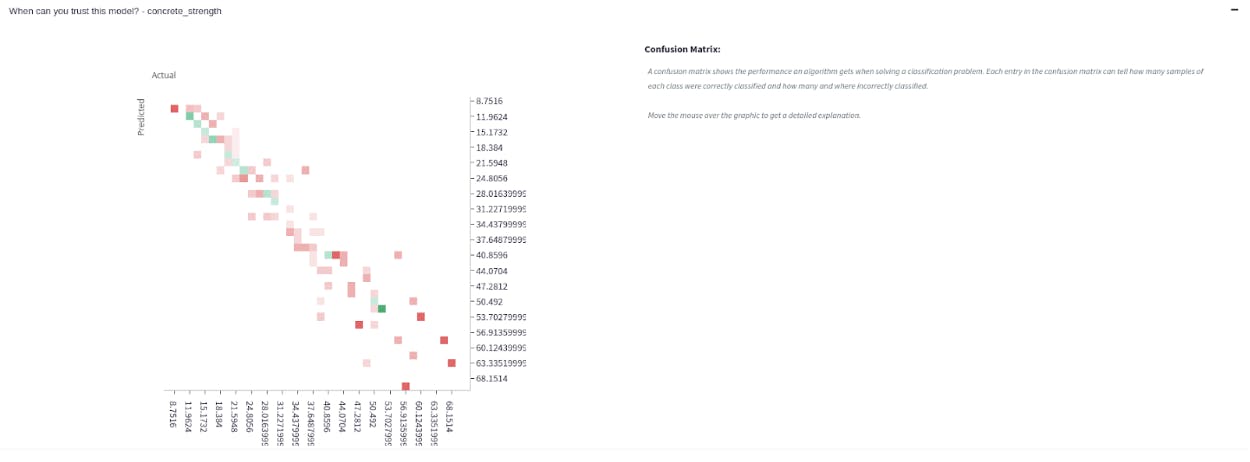
As this is a regression task, we stratify the true and predicted values to analyze how effective predictions are at reflecting the underlying data patterns. Strongly performing models have a notable diagonal component: this indicates that a model is successful at detecting the relationship between features and the output distribution. Elements located away from the main diagonal imply less accurate predictions (this could be, for example, due to sparse sampling of data in these output regions). The next step is to use the MQL to get the predictions back from the model collection.
Querying the model
After we have trained a model, we can go ahead and query the model. Using MQL, we will need to call the find() method on the model collection. In addition, we need to provide specific values for which we would like to obtain a prediction. An example would be:
db.strength.find({'age': 28,
     'superPlasticizer': 2.5, slag: 1,
     'water': 162, 'fineAggregate': 1040})
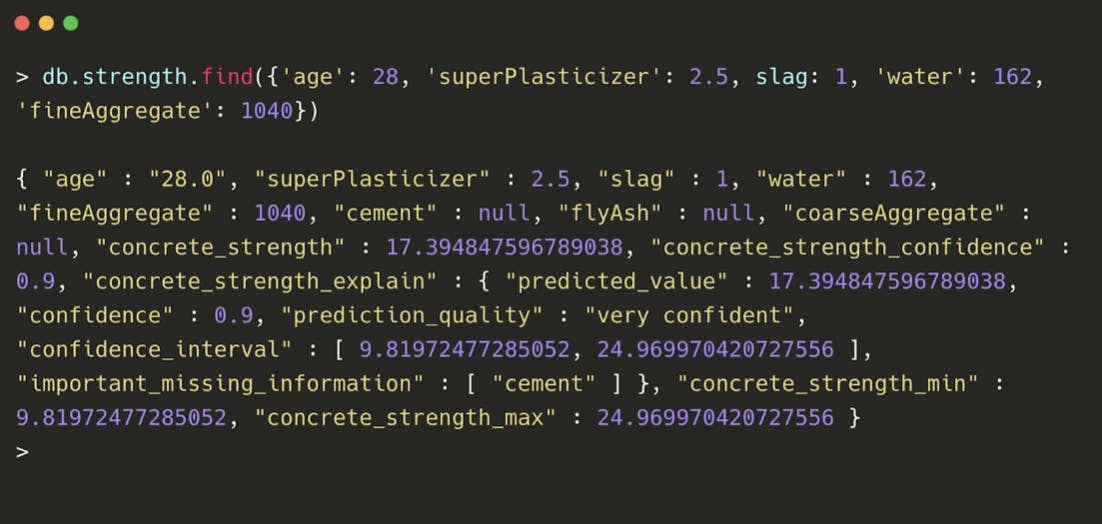
The model created by MindsDB predicts a value of 17.3 with 90% confidence that the true value lies within the confidence_interval lower and upper bounds. One important piece of information is also the important_missing_information value where MindsDB suggests including values of the cement feature to the find() function will improve the prediction.
This tutorial highlights the steps to create a predictive model inside MongoDB by leveraging MindsDB’s AutoML framework. Using the existing compute configuration, the example above took less than five minutes, without the need for extensive tooling, or pipelines in addition to your database. With MindsDB’s predictive capabilities inside MongoDB, developers can now build machine learning models at reduced cost, gain greater insight into model accuracy, and help users make better data-based decisions.
Modernize with MongoDB and MindsDB
MongoDB provides an intuitive process for data management and exploration by simplifying and enriching data. MindsDB helps turn data into intelligent insights by simplifying modernization into machine learning, AI, and the ongoing spectrum of data science.
For a limited time, try MindsDB to connect to MongoDB, train models, and run predictions in the cloud. Simply sign-up here. It’s free (final pricing to be announced later this year), and our team is available on Slack and Github for feedback and support. Check it out and let us know what predictions you come up with.